I have to say I have been really happy with my Raspberry Pi devices so far. I have a couple of 1st gen Rpis, one is running OpenElec for streaming movies from my home server movie library and another one is running arch linux and working as a DHCP/DNS server and network monitor with ICINGA.
Now I received my first Raspberry Pi 3 from Element14 (€38.20). It has more CPU power (with 1.2GHz 64-bit quad-core ARMv8 CPU), more memory (1 GB), integrated 802.11n Wifi (2.4 GHz band), bluetooth LE and lots of other improvements compared to the original RPis.
My intention now is to try to install the ownCloud server software to the new RPi 3. With ownCloud (see https://owncloud.org/) you can create your own dropbox like service that you can use for sharing documents, photos and other files and information (calendar, contacts, etc.).
Installing Raspbian
I guess raspbian is the most popular linux distribution for RPis. So let’s start by installing that. The SD card image can be downloaded from: https://www.raspberrypi.org/downloads/raspbian/
I have a 8GB microSD card that should be ok to get started. So let’s download the Rasbian zip file (2017-01-11-raspbian-jessie.zip), unzip the file and write the image to the SD card. I will use my windows based image writer (Win32DiskImager) for that task.
Next let’s insert the SD card to the RPi, connect the USB keyboard, USB mouse and the monitor with an HDMI cable. The recommendation for the power supply is 5V/2.5A. Looks like I currently have only a 5V/2A power supply at hand. Let’s see how that works. Probably it will work just fine as long I don’t attach a lot of power hungry peripherals. 🙂
Starting up
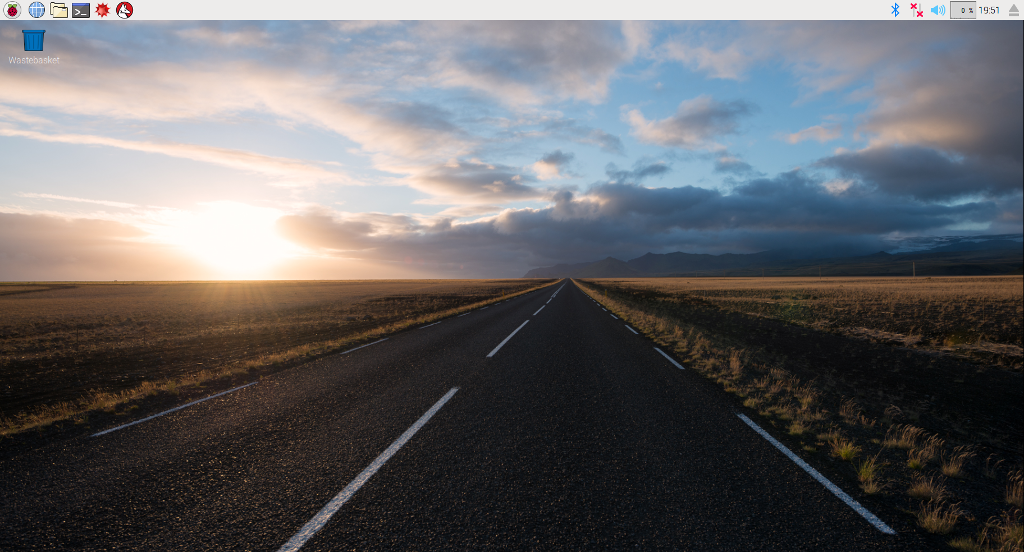
Alright, let’s connect the 2 amp power supply and see what happens. Booting… and ready!
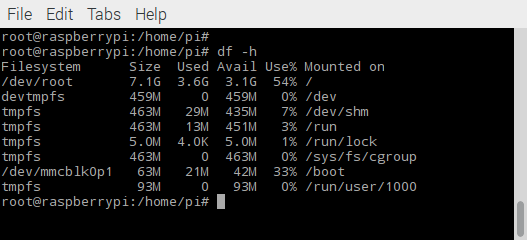
During the boot the SD card root partition was resized automatically to occupy the whole card space. Looks like I have about 3 GB still available on the root partition.
Setting up
First I will need to connect to my home wi-fi network to get some connectivity. That is easy, just select the correct network from the network applet (on the right hand side of the task bar) and enter the password. And we are up and running!
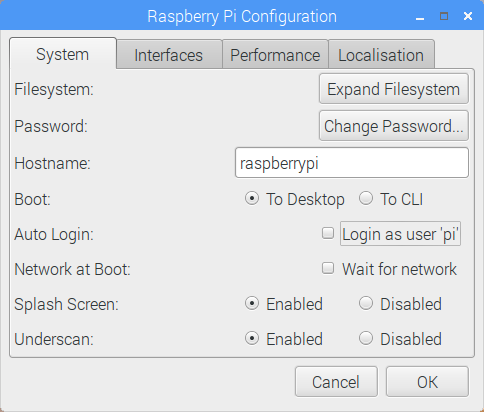
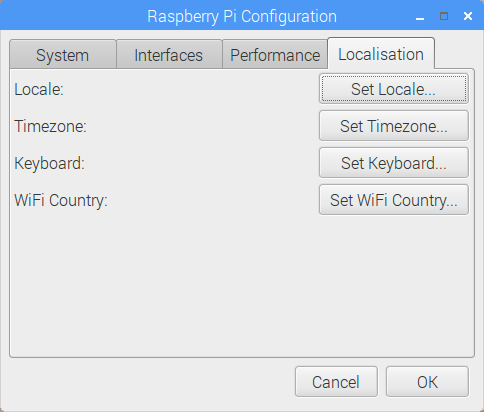
For other basic setups just go to the main menu and select: Preferences > Raspberry Pi Configuration. In the System tab the most important thing is the pi user password. The default password is ‘raspberry’ which everyone knows and which should be replaced with a good password that only you will know. I will also disable the Auto Login feature, because I am going to create a new account for myself. Here you can also change the hostname if you are not happy with ‘raspberrypi’.
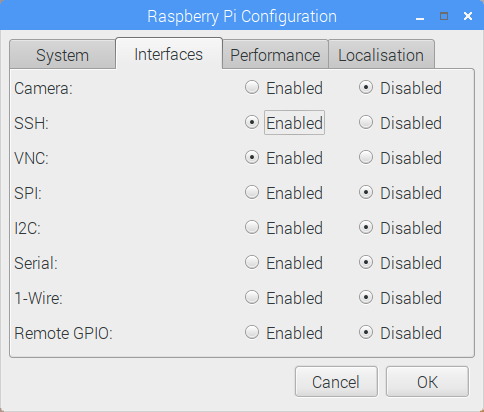
In the Interfaces tab I will enable two services: SSH and VNC. The ssh service is essential for remote RPi administration. The VNC service allows access to the whole X-windows GUI remotely with a VNC viewer.
Nothing to change in the Performance tab. In the Localisation tab I can set the country specific features (like the correct keyboard layout).
A reboot is required to make the changes effective. Let’s do that now. After reboot the ssh and vnc servers should be running. A simple test for ssh is to try to connect to the localhost.
$ ssh localhost
For vnc access just download the viewer from www.realvnc.com. E.g. the windows version can be downloaded from: https://www.realvnc.com/download/viewer/windows/
It is also possible to configure the settings from the command line with the raspi-config tool. Just open a terminal and run the tool.
$ sudo raspi-config
Static IP address
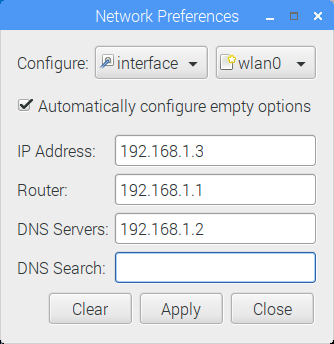
As I’m going to use the RPi as a server it is better to switch from dynamic (DHCP) IP address to a static one. Right-click the network applet in the task bar and select: Wireless & Wired Network Settings. And then fill in the desired IP Address, the router address and the DNS server address (in most cases this is the same as the router address).
The changes are taken into use after the next reboot.
Adding a new user account
Next I will add an account for myself so I don’t need to use the default ‘pi’ account. Just replace ‘eb’ with whatever username you want below. Also let’s make sure that we have the sudo rights to run commands with elevated priviledges (just like the pi user currently). The video group is needed if you want to run mathematica on RPi.
$ sudo useradd --create-home --groups sudo,video eb
$ sudo passwd eb
To test the new account just logout the pi account and login with the new account.
Firewall setup
You have the iptables firewall available by default, but there are easier ways to setup the firewall. I will use the ufw tool.
$ sudo -s
# apt-get update
# apt-get install ufw
To allow ssh access through the firewall via port 22:
# ufw allow 22
# ufw enable
# ufw status
Looks good. To further tighten the ssh access we could specify what accounts are allowed to login with ssh. We need to edit the ssh server configuration file /etc/ssh/sshd_config and change the following parameters to 1) not allow root user to login 2) only allow user ‘eb’ to login (thus user ‘pi’ is not allowed).
PermitRootLogin no
AllowUsers eb
Now we just need to restart the ssh service so that the new configuration is taken into use.
# systemctl restart ssh
# systemctl status ssh
To also allow a VNC connection through the firewall we could be more specific with the rules. If we only want to allow access to the GUI from the local LAN we could specify the IP addresses in the rule. The TCP port number is 5900.
# ufw allow from 192.168.1.0/24 to 192.168.1.3 port 5900 proto tcp
Update Raspbian
As a final step to setup the system let’s get all the latest bug fixes and other updates to the operating system.
# apt-get update
# apt-get dist-upgrade
# apt-get install -y pprompt
The pprompt package provides an additional check to make sure the default password for the pi user is not used.
Preparing for ownCloud
To get started we need to install a webserver (nginx), php5, database (sqlite3), SSL support (openssl) and a couple of other tools (like varnish for HTTP acceleration, git for version control).
# apt-get install nginx openssl php5-cli php5-sqlite php5-gd php5-common php5-cgi sqlite3 php-pear php-apc curl libapr1 libtool curl libcurl4-openssl-dev php-xml-parser php5 php5-dev php5-gd php5-fpm php5-curl memcached php5-memcache varnish php5-apcu git
The webserver root folder is /var/www. The ownCloud server folder can be created as a subdirectory:
# mkdir /var/www/owncloud
The nginx webserver should now be running and listening on port 80. The port is not open yet in the firewall but you can check the server by going to address http://localhost/.
To make the certificate acquisition possible we need to do two things: 1) change the default web server root and 2) allow port 80 (http) and 443 (https) through the firewall. Most of us also have a router with its own firewall. The router settings should be changed so that the ports 80 and 443 on the router will be forwarded to the corresponding ports on our RPi.
First edit the default web server root defined in /etc/nginx/sites-available/default. Change /var/www/html to /var/www/owncloud. Then restart the web server.
# vi /etc/nginx/sites-available/default
# systemctl restart nginx
# systemctl status nginx
Next update the firewall.
# ufw allow 80
# ufw allow 443
I will acquire a SSL certificate for my ownCloud site from Let’s Encrypt (see: https://en.wikipedia.org/wiki/Let’s_Encrypt). First I will download the Let’s Encrypt setup tool (using git to clone the repository from github):
$ cd $HOME/Downloads
$ git clone https://github.com/letsencrypt/letsencrypt
To get all the required extra packages we need to run the letsencrypt-auto script:
$ cd letsencrypt
$ ./letsencrypt-auto --help
Now we are ready to request the SSL certificate for our domain (I’m using a DDNS service to get a domain name for my RPi). If the domain name was ‘rpi.cloud.com’ then the following command would do the job:
$ ./letsencrypt-auto certonly --webroot -w /var/www/owncloud -d rpi.cloud.com
If everything goes well you should see something like this:
./letsencrypt-auto certonly --webroot -w /var/www/owncloud -d rpi.cloud.com
 Requesting root privileges to run certbot...
 /home/pi/.local/share/letsencrypt/bin/letsencrypt certonly --webroot -w /var/www/owncloud -d rpi.cloud.com
 Saving debug log to /var/log/letsencrypt/letsencrypt.log
 Obtaining a new certificate
 Performing the following challenges:
 http-01 challenge for rpi.cloud.com
 Using the webroot path /var/www/owncloud for all unmatched domains.
 Waiting for verification...
 Cleaning up challenges
 Generating key (2048 bits): /etc/letsencrypt/keys/0000_key-certbot.pem
 Creating CSR: /etc/letsencrypt/csr/0000_csr-certbot.pem
 IMPORTANT NOTES:
 - Congratulations! Your certificate and chain have been saved at
 /etc/letsencrypt/live/rpi.cloud.com/fullchain.pem. Your cert will
 expire on 2017-05-06. To obtain a new or tweaked version of this
 certificate in the future, simply run letsencrypt-auto again. To
 non-interactively renew *all* of your certificates, run
 "letsencrypt-auto renew"
 - If you like Certbot, please consider supporting our work by:
Donating to ISRG / Let's Encrypt:   https://letsencrypt.org/donate
Donating to EFF:                    https://eff.org/donate-le
Make sure the private key permissions are set so that only root can read the file.
# chmod 400 /etc/letsencrypt/live/rpi.cloud.com/privkey.pem
Next we need to update the web server default configuration to fully operate with ownCloud. Just delete the current contents (make a backup if needed) and replace with the following example (replacing rpi.cloud.com with the correct domain name). This configuration was copied from the owncloud.org site.
upstream php-handler {
    server 127.0.0.1:9000;
    #server unix:/var/run/php6-fpm.sock;
}

server {
    listen 80;
    server_name rpi.cloud.com;
    # enforce https
    return 301 https://$server_name$request_uri;
}

server {
    listen 443 ssl;
    server_name rpi.cloud.com;

    ssl_certificate /etc/letsencrypt/live/rpi.cloud.com/fullchain.pem;
    ssl_certificate_key /etc/letsencrypt/live/rpi.cloud.com/privkey.pem;

    # Add headers to serve security related headers
    # Before enabling Strict-Transport-Security headers please read into this topic first.
    add_header Strict-Transport-Security "max-age=15552000; includeSubDomains";
    add_header X-Content-Type-Options nosniff;
    add_header X-Frame-Options "SAMEORIGIN";
    add_header X-XSS-Protection "1; mode=block";
    add_header X-Robots-Tag none;
    add_header X-Download-Options noopen;
    add_header X-Permitted-Cross-Domain-Policies none;

    # Path to the root of your installation
    root /var/www/owncloud/;

    location = /robots.txt {
        allow all;
        log_not_found off;
        access_log off;
    }

    # The following 2 rules are only needed for the user_webfinger app.
    # Uncomment it if you're planning to use this app.
    #rewrite ^/.well-known/host-meta /public.php?service=host-meta last;
    #rewrite ^/.well-known/host-meta.json /public.php?service=host-meta-json last;

    location = /.well-known/carddav {
        return 301 $scheme://$host/remote.php/dav;
    }
    location = /.well-known/caldav {
        return 301 $scheme://$host/remote.php/dav;
    }

    location /.well-known/acme-challenge { }

    # set max upload size
    client_max_body_size 512M;
    fastcgi_buffers 64 4K;

    # Disable gzip to avoid the removal of the ETag header
    gzip off;

    # Uncomment if your server is build with the ngx_pagespeed module
    # This module is currently not supported.
    #pagespeed off;

    error_page 403 /core/templates/403.php;
    error_page 404 /core/templates/404.php;

    location / {
        rewrite ^ /index.php$uri;
    }

    location ~ ^/(?:build|tests|config|lib|3rdparty|templates|data)/ {
        return 404;
    }
    location ~ ^/(?:\.|autotest|occ|issue|indie|db_|console) {
        return 404;
    }

    location ~ ^/(?:index|remote|public|cron|core/ajax/update|status|ocs/v[12]|updater/.+|ocs-provider/.+|core/templates/40[34])\.php(?:$|/) {
        fastcgi_split_path_info ^(.+\.php)(/.*)$;
        include fastcgi_params;
        fastcgi_param SCRIPT_FILENAME $document_root$fastcgi_script_name;
        fastcgi_param PATH_INFO $fastcgi_path_info;
        fastcgi_param HTTPS on;
        fastcgi_param modHeadersAvailable true; #Avoid sending the security headers twice
        fastcgi_param front_controller_active true;
        fastcgi_pass php-handler;
        fastcgi_intercept_errors on;
#        fastcgi_request_buffering off; #Available since nginx 1.7.11
    }

    location ~ ^/(?:updater|ocs-provider)(?:$|/) {
        try_files $uri $uri/ =404;
        index index.php;
    }

    # Adding the cache control header for js and css files
    # Make sure it is BELOW the PHP block
    location ~* \.(?:css|js)$ {
        try_files $uri /index.php$uri$is_args$args;
        add_header Cache-Control "public, max-age=7200";
        # Add headers to serve security related headers (It is intended to have those duplicated to the ones above)
        # Before enabling Strict-Transport-Security headers please read into this topic first.
        #add_header Strict-Transport-Security "max-age=15552000; includeSubDomains";
        add_header X-Content-Type-Options nosniff;
        add_header X-Frame-Options "SAMEORIGIN";
        add_header X-XSS-Protection "1; mode=block";
        add_header X-Robots-Tag none;
        add_header X-Download-Options noopen;
        add_header X-Permitted-Cross-Domain-Policies none;
        # Optional: Don't log access to assets
        access_log off;
    }

    location ~* \.(?:svg|gif|png|html|ttf|woff|ico|jpg|jpeg)$ {
        try_files $uri /index.php$uri$is_args$args;
        # Optional: Don't log access to other assets
        access_log off;
    }
}
Here are some other settings that should be changed.
In the file /etc/php5/fpm/php.ini set the maximum upload file size (e.g. 2GB). The setting always_populate_raw_post_data should also be set, otherwise ownCloud will complain about that later.
upload_max_filesize = 2000M
post_max_size = 2000M
always_populate_raw_post_data = -1
In the file /etc/php5/fpm/pool.d/www.conf update the socket definition to match the web server default setting. Also uncomment the lines that define environment variables.
listen = 127.0.0.1:9000
env[HOSTNAME] = $HOSTNAME
env[PATH] = /usr/local/bin:/usr/bin:/bin
env[TMP] = /tmp
env[TMPDIR] = /tmp
env[TEMP] = /tmp
In the file /etc/dphys-swapfile update the swap file size.
CONF_SWAPSIZE=512
Next we need to restart the web server (and check that it does not complain about the new configuration).
# systemctl restart nginx
# systemctl status nginx
Installing an external hard drive
I think at this stage I should connect an external USB hard drive to the RPi to be used as the ownCloud data storage. Seems I have one 150 GB USB drive at hand so I will use that one. I am going to take the power from the RPi USB ports. Let’s hope my 2 amp power supply can still handle that. 🙂
So first I will just power off the RPi and connect the USB drive. After reboot everything seems to be still going well. The new drive seems to be connected to /dev/sda1. Let’s create a new ext4 filesystem to the disk and mount the disk in /media/owncloud.
# fdisk -l /dev/sda

Disk /dev/sda: 149.1 GiB, 160041885184 bytes, 312581807 sectors
Units: sectors of 1 * 512 = 512 bytes
Sector size (logical/physical): 512 bytes / 512 bytes
I/O size (minimum/optimal): 512 bytes / 512 bytes
Disklabel type: dos
Disk identifier: 0xf8497034

Device     Boot Start       End   Sectors   Size Id Type
/dev/sda1          63 312581807 312581745 149.1G  7 HPFS/NTFS/exFAT

# mkfs.ext4 /dev/sda1 -L ownCloud-Vol-1
mke2fs 1.42.12 (29-Aug-2014)
Creating filesystem with 39072718 4k blocks and 9773056 inodes
Filesystem UUID: c76d4399-652b-4c09-b368-d822e4519333
Superblock backups stored on blocks:
    32768, 98304, 163840, 229376, 294912, 819200, 884736, 1605632, 2654208,
    4096000, 7962624, 11239424, 20480000, 23887872

Allocating group tables: done
Writing inode tables: done
Creating journal (32768 blocks): done
Writing superblocks and filesystem accounting information: done

# mkdir /media/owncloud
# mount /dev/sda1 /media/owncloud
We also want to mount the drive automatically at boot time. That can be accomplished by editing the file system table in /etc/fstab as shown below.
# vi /etc/fstab
LABEL=ownCloud-Vol-1 /media/owncloud ext4 defaults,noatime 0 0
To test that the fstab settings work just umount the drive and mount it again using just the mount point name.
# umount /media/owncloud
# mount /media/owncloud
As a final step let’s create a subfolder ‘data’ to the owncloud disk and set the owner to www-data.
# mkdir /media/owncloud/data
# chown www-data:www-data /media/owncloud/data
Installing ownCloud
The current ownCloud stable release seems to be 9.1.4 so I will install that one. Let’s get the installation package from the ownCloud site.
$ cd $HOME/Downloads
$ wget https://download.owncloud.org/community/owncloud-9.1.4.tar.bz2
$ tar xjf owncloud-9.1.4.tar.bz2
Next we need to replace /var/www/owncloud with the downloaded content. So let’s first delete the current folder and then move the new folder to the same location. Make sure www-data owns the files.
# rm -rf /var/www/owncloud
# mv owncloud /var/www
# chown -R www-data:www-data /var/www/owncloud
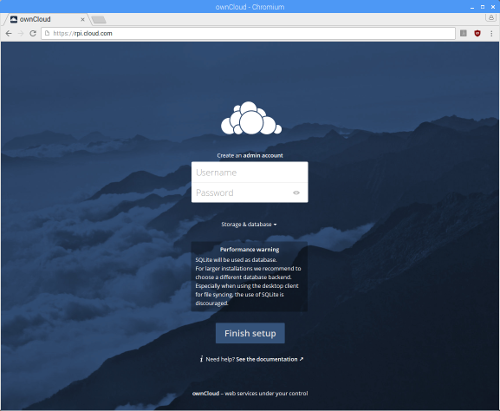
ownCloud is now installed. Just reboot and you should be able to open your ownCloud configuration page.
Click the label: Storage and database and change the data folder location to /media/owncloud/data. Enter the username and password for the admin account and click Finish setup.
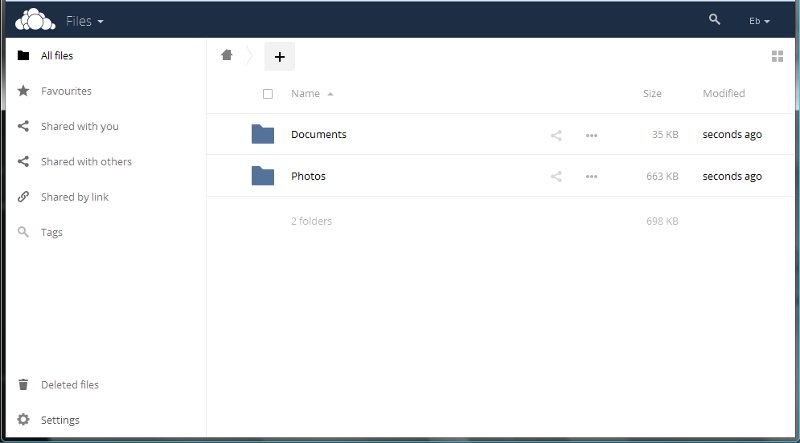
Looks like we have a our ownCloud server up and running!
Installing ownCloud Desktop Client
Now let’s see if we can setup a dropbox like desktop sync with our ownCloud. The client applications for different platforms are available at the ownCloud site: https://owncloud.org/install/#install-clients
Before starting I will create an ordinary user account for me. I will then use that account for syncing content.
Let’s download the windows installer. The setup is really simple, just enter the server address, the username and the password and the local folder where files will be synced.
The local folder is now automatically synced from the RPi ownCloud server. E.g. I can now see the example photos in my local windows folder.
Security update
To further tighten the SSL security level of our ownCloud server we could do a couple of additional changes. These are based on the excellent SSL security tutorial: https://raymii.org/s/tutorials/Strong_SSL_Security_On_nginx.html.
First we need to generate a stronger Diffie-Hellman key exchange parameter (this takes a very long time, I let it run over night).
# cd /etc/ssl/certs
# openssl dhparam -out dhparam.pem 4096
Then we can update the nginx SSL parameters in the file /etc/nginx/nginx.conf.
ssl_session_cache shared:SSL:10m;
ssl_ciphers 'EECDH+AESGCM:EDH+AESGCM:AES256+EECDH:AES256+EDH';
ssl_dhparam /etc/ssl/certs/dhparam.pem;
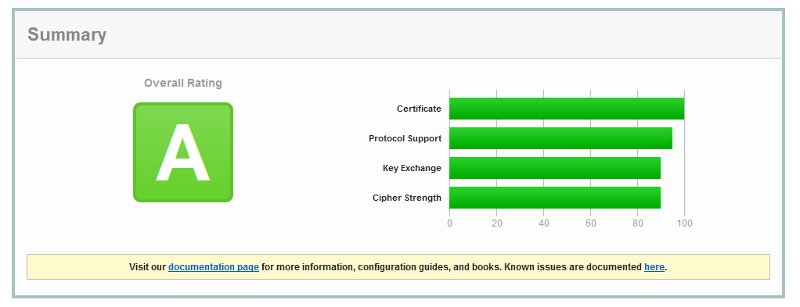
You can test the SSL security by going to the QUALYS SSL server test page https://www.ssllabs.com/ssltest/
I did get the ‘A’ rating so I think the server should be pretty secure now at least what comes to the SSL protocol.
Renewing the certificate
While I installed the Let’s Encrypt certificate I was reminded that the certificate will expire after some time:
Your cert will expire on 2017-05-06.
After the certificate has expired the ownCloud access will fail. E.g. Firefox refuses to connect and tell’s that the certificate is no longer valid.
To renew the certificate just go to the letsencrypt folder that was downloaded from GitHub. As root run the following commands:
# systemctl stop nginx
# ./letsencrypt-auto renew --standalone
Saving debug log to /var/log/letsencrypt/letsencrypt.log

-------------------------------------------------------------------------------
Processing /etc/letsencrypt/renewal/rpi.cloud.com.conf
-------------------------------------------------------------------------------
Cert is due for renewal, auto-renewing...
Renewing an existing certificate
Performing the following challenges:
tls-sni-01 challenge for rpi.cloud.com
Waiting for verification...
Cleaning up challenges

-------------------------------------------------------------------------------
new certificate deployed without reload, fullchain is
/etc/letsencrypt/live/rpi.cloud.com/fullchain.pem
-------------------------------------------------------------------------------

Congratulations, all renewals succeeded. The following certs have been renewed:
  /etc/letsencrypt/live/rpi.cloud.com/fullchain.pem (success)
# systemctl start nginx
