Using Raspberry Pi as a simple linux server is really easy. As an example we could setup a DNS and a DHCP server for our local network using the dnsmasq service. Having a local caching DNS server speeds up the name resolution. In addition the DHCP service can be easily configured to give a name to each device in the LAN so that you can connect to the devices using a name of your choice instead of an IP address (or some default device name).
I’m going to use Arch Linux because it provides all the needed tools without anything extra (like graphical user interaces). Using only the command line interface is quite enough for a simple server system.
The installation steps are described below.
- Get the Arch Linux SD-card image file from the Raspberry Pi website.
http://www.raspberrypi.org/downloads/
Here is also a direct download link:
http://downloads.raspberrypi.org/arch/images/arch-2014-06-22/ArchLinuxARM-2014.06-rpi.img.zip
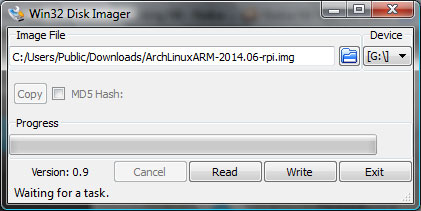
- Unzip the image file and write the file (ArchLinuxARM-2014.06-rpi.img) to an SD-card. In windows this can be done with Win32DiskImager app. Win32DiskImager can be downloaded from the SourceForge page:
http://sourceforge.net/projects/win32diskimager
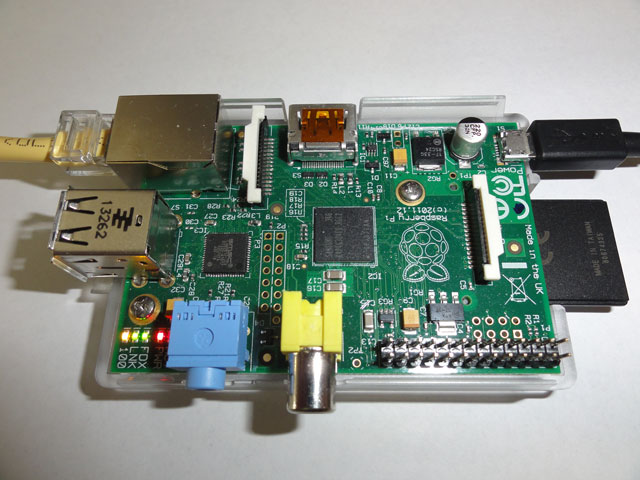
- Insert the SD card to Raspberry Pi, connect the ethernet cable and the power supply cable. No display, keyboard or mouse are needed because we can login with SSH remotely.

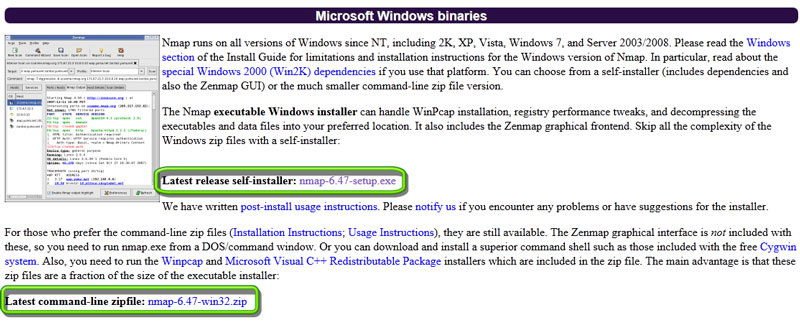
- Find out the Raspberry PI IP address from the DHCP server. Or download the nmap tool from
http://nmap.org/download.html
You can select either the complete tool set or just the command like nmap tool.

Nmap will scan the local network and display the IP address for every device that it finds.D:\Apps\Nmap>nmap -sn 192.168.1.0/24
Starting Nmap 6.47 ( http://nmap.org ) at 2015-02-12 21:24 FLE Standard Time
…
Nmap scan report for alarmpi.home (192.168.1.167)
Host is up (0.00s latency).
MAC Address: B8:27:EB:C0:FF:EE (Raspberry Pi Foundation) - Next fire up PuTTY, enter the Raspberry Pi IP address and login. Username is root and the password is root.
Console keymap
If you are like me and using a non-US keyboard you may want to change the keyboard layout and update the keymap setting in the file /etc/vconsole.conf.
| # loadkeys fi # cat /etc/vconsole.conf KEYMAP=fi |
Setting the locale
To setup the locale edit the file /etc/locale.gen and uncomment the line that matches your locale. Then run locale-gen.
| # grep -v ^# /etc/locale.gen fi_FI.UTF-8 UTF-8 # locale-gen Generating locales… fi_FI.UTF-8… done Generation complete. |
Setting the time zone
The time zone is set by creating a symbolic link from /etc/localtime to a time zone file located in /usr/share/zoneinfo. In my case it is Europe/Helsinki.
| # ln -sf /usr/share/zoneinfo/Europe/Helsinki /etc/localtime |
Defining the host name
You can put the host name into /etc/hostname with the command:
| # hostnamectl set-hostname rpi |
Setting up static IP address
By default Arch linux is configured to use dynamic IP address (via DHCP). The network profile is defined in the file /etc/netctl/eth0.
| # cat /etc/netctl/eth0 Description=’A basic dhcp ethernet connection’ Interface=eth0 Connection=ethernet IP=dhcp ExecUpPost=’/usr/bin/ntpd -gq || true’ |
The ExecUpPost line will invoke ntpd to synchronize the time when the network comes up (the time servers are defined in /etc/ntp.conf). This is necessary because RPi does not have a real time clock and thus will forget the time when rebooted.
By default the network interface is controlled by the systemd unit called netctl-ifplugd@eth0.service:
netctl-ifplugd@<interface>.service
This unit starts ifplugd on the interface it is used for. It will
try to start a netctl profile whenever a cable is plugged into the
interface and stop the profile when the cable is unplugged.
You can check the status of the service with the following command (you can drop the “service” suffix from the service name as it is the default):
| # systemctl status netctl-ifplugd@eth0 |
The ifplugd is a kind of supervisor for the network interface. It detects when the network becomes available (e.g. when the ethernet connector is plugged in) and configures the network interface using one of the available profiles in /etc/netctl. It is actually quite useful in a headless setup where losing the network would mean that you have to connect a keyboard and a monitor to get the system up again.
As an experiment let’s turn off the network and see what happens.
| # ip link show dev eth0 4: eth0: <BROADCAST,MULTICAST,UP,LOWER_UP> mtu 1500 qdisc pfifo_fast state UP mode DEFAULT group default qlen 1000 link/ether b8:27:eb:c0:ff:ee brd ff:ff:ff:ff:ff:ff # ip link set eth0 down |
The terminal freezes for a moment but wakes up soon again. You can check what happened by looking at the system log file:
| # journalctl -e rpi dhcpcd[238]: eth0: carrier lost rpi dhcpcd[238]: eth0: deleting route to 192.168.1.0/24 rpi avahi-daemon[119]: Interface eth0.IPv4 no longer relevant for mDNS. rpi avahi-daemon[119]: Leaving mDNS multicast group on interface eth0.IPv4 with address 192.168.1.167. rpi avahi-daemon[119]: Withdrawing address record for 192.168.1.167 on eth0. rpi dhcpcd[238]: eth0: deleting default route via 192.168.1.1 rpi kernel: smsc95xx 1-1.1:1.0 eth0: hardware isn’t capable of remote wakeup rpi kernel: smsc95xx 1-1.1:1.0 eth0: hardware isn’t capable of remote wakeup rpi ifplugd[117]: Link beat lost. rpi dhcpcd[238]: eth0: carrier acquired rpi dhcpcd[238]: eth0: soliciting a DHCP lease rpi kernel: smsc95xx 1-1.1:1.0 eth0: link up, 100Mbps, full-duplex, lpa 0xCDE1 rpi ifplugd[117]: Link beat detected. rpi dhcpcd[238]: eth0: offered 192.168.1.167 from 192.168.1.1 rpi dhcpcd[238]: eth0: leased 192.168.1.167 for 43200 seconds rpi avahi-daemon[119]: Joining mDNS multicast group on interface eth0.IPv4 with address 192.168.1.167. rpi avahi-daemon[119]: New relevant interface eth0.IPv4 for mDNS. rpi avahi-daemon[119]: Registering new address record for 192.168.1.167 on eth0.IPv4. rpi dhcpcd[238]: eth0: adding route to 192.168.1.0/24 rpi dhcpcd[238]: eth0: adding default route via 192.168.1.1 |
So the ifplugd daemon brought the network immediately back up. Cool. 😎
But what if I would like to switch from the dynamic IP address to a static one? Well first of all I will need a suitable network profile. There are a few example profiles in /etc/netctl/examples. I will use the file ethernet-static as a template for my static IP configuration can copy it to /etc/netctl/eth0static and then edit it.
| # cp /etc/netctl/examples/ethernet-static /etc/netctl/eth0static <edit the file…> Connection=ethernet AutoWired=yes ExcludeAuto=no Priority=2 IP=static Address=(‘192.168.1.6/24’) Gateway=’192.168.1.1′ DNS=(‘192.168.1.1’) ExecUpPost=’/usr/bin/ntpd -gq || true’ |
There are some special settings that are necessary to get the static IP profile working:
- AutoWired=yes This option makes ifplugd to consider also other than DHCP profiles when selecting the network profile.
- ExcludeAuto=no prevents ifplugd from excluding this profile during the profile selection. By default static IP profiles will be excluded from the selection process.
- Priority=2 sets the eth0static profile priority higher than the eth0 profile (having a default priority of 1). Hence the profile selection process will prefer eth0static.
As a final step let’s reboot and check that the static IP address is taken into use.
| # reboot |
Looks like I can login with ssh using the new static address 192.168.1.6. Great!
| # ip addr show dev eth0 4: eth0: <BROADCAST,MULTICAST,UP,LOWER_UP> mtu 1500 qdisc pfifo_fast state UP group default qlen 1000 link/ether b8:27:eb:c0:ff:ee brd ff:ff:ff:ff:ff:ff inet 192.168.1.6/24 brd 192.168.1.255 scope global eth0 valid_lft forever preferred_lft forever |
And the log file confirms that ifplugd worked as expected:
| # journalctl –unit=netctl-ifplugd@eth0 rpi ifplugd[119]: ifplugd 0.28 initializing. rpi ifplugd[119]: Using interface eth0/B8:27:EB:C0:FF:EE with driver <smsc95xx> (version: 22-Aug-2005) rpi ifplugd[119]: Using detection mode: SIOCETHTOOL rpi ifplugd[119]: Initialization complete, link beat not detected. rpi ifplugd[119]: Link beat detected. rpi ifplugd[119]: Executing ‘/etc/ifplugd/netctl.action eth0 up’. rpi ifplugd[119]: client: up rpi ifplugd[119]: client: Reading profile ‘eth0static’ rpi ifplugd[119]: client: Reading profile ‘eth0’ rpi ifplugd[119]: client: Starting network profile ‘eth0static’… rpi ifplugd[119]: client: Started network profile ‘eth0static’ rpi ifplugd[119]: Program executed successfully. |
Updating the operating system
In Arch linux the package manager “pacman” is used to install new packages and to update the existing ones. To bring the operating system up-to-date:
| # pacman –sync –sysupgrade –refresh # pacman-db-upgrade |
The upgrade contained a set of new configuration files. If the existing old configuration file couldn’t be replaced (e.g. because it had been edited) the upgrade process created a new configuration file with the name <config file>.pacnew.
You can use the find command to find the files.
| # find / -name \*.pacnew /boot/cmdline.txt.pacnew /boot/config.txt.pacnew /etc/shadow.pacnew /etc/group.pacnew /etc/gshadow.pacnew /etc/passwd.pacnew /etc/dhcpcd.conf.pacnew /etc/ntp.conf.pacnew /etc/locale.gen.pacnew |
I guess there is no easy way to take the new files into use. You just have to compare the files one by one and migrate from the old configuration file to the new one manually. Special care should be taken when upgrading the boot files (cmdline.txt and config.txt) because a mistake there could make the RPi unbootable. On the other hand there could be issues if a new kernel is taken into use without updating the kernel parameters coming from the cmdline.txt.
Ok, I think we just need to bite the bullet and update the boot files. Let’s first compare cmdline.txt. I will split the options and sort the lines to make the comparison easier.
| # cat /boot/cmdline.txt |tr ” ” “\n”|sort > cmdline.1.txt # cat /boot/cmdline.txt.pacnew |tr ” ” “\n”|sort > cmdline.2.txt # sdiff -w 50 cmdline.1.txt cmdline.2.txt avoid_safe_mode=1 < console=tty1 console=tty1 console=ttyAMA0,11520 console=ttyAMA0,11520 dwc_otg.lpm_enable=0 dwc_otg.lpm_enable=0 elevator=noop elevator=noop ipv6.disable=1 < kgdboc=ttyAMA0,115200 kgdboc=ttyAMA0,115200 plymouth.enable=0 plymouth.enable=0 root=/dev/mmcblk0p5 | root=/dev/mmcblk0p2 rootfstype=ext4 < rootwait rootwait > rw selinux=0 selinux=0 smsc95xx.turbo_mode=N smsc95xx.turbo_mode=N |
Ok, pacnew has incorrect root device. Using the file as it is would definitely not work. Otherwise the only addition is the ‘rw’ option. Let’s add that to the current cmdline.txt file. Looking at the config.txt file it seems there are just some changed comment lines. So I think it’s safe to replace the old config.txt with the new one.
Rebooting RPi confirms my assumptions. RPi still boots with the static IP address just fine.
Setting up swap
By default there is no swap space available. I will create a small swap file just in case it’s needed later on.
| # fallocate –l 128M /swapfile # chmod 600 /swapfile # mkswap /swapfile # swapon /swapfile |
To make it available during reboot let’s also update /etc/fstab.
## /etc/fstab: static file system information## <file system> <dir> <type> <options> <dump> <pass>/dev/mmcblk0p1 /boot vfat defaults 0 0/swapfile none swap defaults 0 0 |
Installing apps
New apps can be installed easily with pacman. Let’s first search for my favourite process monitor.
| # pacman -Ss htop extra/htop 1.0.3-2 Interactive process viewer |
Ok, it’s available in the repositories, let’s install it.
| # pacman -S htop resolving dependencies… looking for conflicting packages…Packages (1) htop-1.0.3-2Total Download Size: 0.05 MiB Total Installed Size: 0.15 MiB:: Proceed with installation? [Y/n] :: Retrieving packages … htop-1.0.3-2-armv6h 54.3 KiB 452K/s 00:00 [######################] 100% (1/1) checking keys in keyring [######################] 100% (1/1) checking package integrity [######################] 100% (1/1) loading package files [######################] 100% (1/1) checking for file conflicts [######################] 100% (1/1) checking available disk space [######################] 100% (1/1) installing htop [######################] 100% Optional dependencies for htop lsof: show files opened by a process strace: attach to a running process |
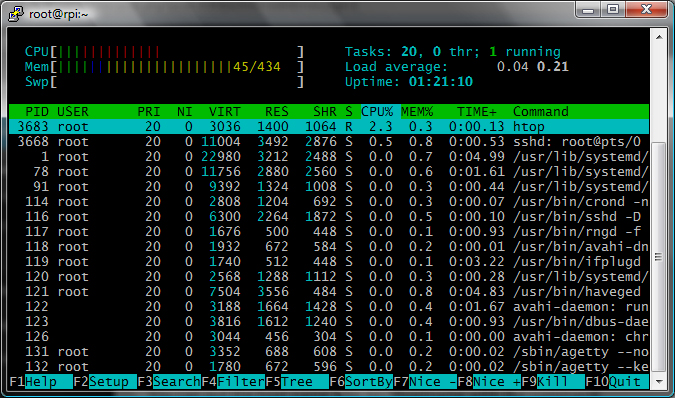
Let’s fire it up.
| # htop |
Seems to work just fine.
Here are some other useful pacman commands:
- pacman -Qs <string> : search already installed packages for <string>.
- pacman -Qi <package>: display information about a package.
- pacman -Ql <package>: list the installed files for a package.


